# 5.1 填充(Padding)
Padding可以给其子节点添加填充(留白),和边距效果类似。我们在前面很多示例中都已经使用过它了,现在来看看它的定义:
Padding({
  ...
  EdgeInsetsGeometry padding,
  Widget child,
})
1
2
3
4
5
2
3
4
5
EdgeInsetsGeometry是一个抽象类,开发中,我们一般都使用EdgeInsets类,它是EdgeInsetsGeometry的一个子类,定义了一些设置填充的便捷方法。
# EdgeInsets
我们看看EdgeInsets提供的便捷方法:
fromLTRB(double left, double top, double right, double bottom):分别指定四个方向的填充。all(double value): 所有方向均使用相同数值的填充。only({left, top, right ,bottom }):可以设置具体某个方向的填充(可以同时指定多个方向)。symmetric({ vertical, horizontal }):用于设置对称方向的填充,vertical指top和bottom,horizontal指left和right。
# 示例
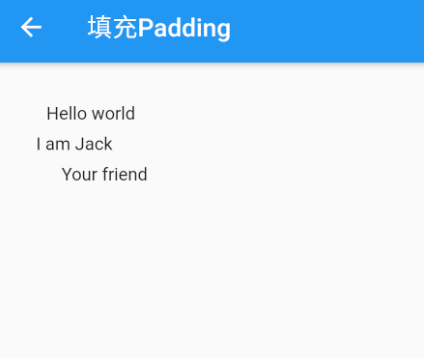
下面的示例主要展示了EdgeInsets的不同用法,比较简单,源码如下:
class PaddingTestRoute extends StatelessWidget {
Widget build(BuildContext context) {
return Padding(
//上下左右各添加16像素补白
padding: EdgeInsets.all(16.0),
child: Column(
//显式指定对齐方式为左对齐,排除对齐干扰
crossAxisAlignment: CrossAxisAlignment.start,
children: <Widget>[
Padding(
//左边添加8像素补白
padding: const EdgeInsets.only(left: 8.0),
child: Text("Hello world"),
),
Padding(
//上下各添加8像素补白
padding: const EdgeInsets.symmetric(vertical: 8.0),
child: Text("I am Jack"),
),
Padding(
// 分别指定四个方向的补白
padding: const EdgeInsets.fromLTRB(20.0,.0,20.0,20.0),
child: Text("Your friend"),
)
],
),
);
}
}
1
2
3
4
5
6
7
8
9
10
11
12
13
14
15
16
17
18
19
20
21
22
23
24
25
26
27
28
29
30
2
3
4
5
6
7
8
9
10
11
12
13
14
15
16
17
18
19
20
21
22
23
24
25
26
27
28
29
30
运行效果如图5-1所示:


请作者喝杯咖啡
版权所有,禁止私自转发、克隆网站。
